Printing a document
To print a document:
- Click the
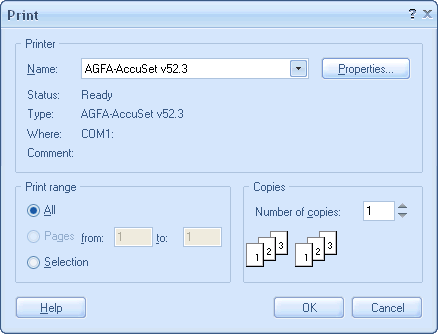
 Print item in the File menu or on the General toolbar. A standard Windows Print dialog box will open.
The Print dialog box 
- Choose a printer and set its Properties if necessary.
- Specify the number of copies.
- Click Ok to proceed. The Printout Setup dialog box will open.
The Printout Setup dialog box 
The left pane of the dialog box contains controls for setting up printing options. The Preview pane shows a printout on a page. Unprintable margins of a page a showed by a dashed rectangle.
The Printout Setup dialog box is used to set the position of the print on the page.
- Select one of available paper types to print and specify options:
- Plain paper - for standard printer paper.
To change page orientation, select one of available items from the Orientation drop-down list or click the
 button.
To center the print on the page, select the Center layout on the page checkbox.
- Label stock - for label paper.
To specify label stock, select one of available items from the Labels drop-down list. If you have not found the label stock you need, see FAQ: What should I do if my label stock is not available in the list of labels?
To specify label position on the page, select one of available items from the Positions drop-down list.
- Disk Surface - for CD DVD label printers.
To specify the printer model, select one of available items from the Printers drop-down list. If you have not found the label printer you need, see FAQ: What should I do if my CD DVD label printer is not available in the list of printers?
 Tip: Before printing on disk surface, choose and configure the appropriate printer feed. Read Printer setup for more info.
- Plain paper - for standard printer paper.
- Specify horizontal and vertical adjustment by typing in values into the appropriate fields to correct the print position (e.g. in case the label is not centered). See Customizing the application for more info about how to change measurement units.
 Note: Most printers have unprintable margins. Be careful not to overlap them.
 - Specify print options. To print cut or fold lines, select the corresponding checkboxes.
- Click the Ok button to start printing a document.
 Note: If document size is large, printing may take some time. Please, wait till the command has been executed.
 Tip: See Customizing the application for more info about how to control print rendering quality.
 Related topics:
- User interface at a glance
- List of supported labels
- List of supported CD printers
- FAQ: The software works slowly. How can I make it quicker?
- FAQ: An error occurred when printing a document. What am I to do?
- FAQ: What should I do if my label stock paper is not available in the list of labels?
- FAQ: What should I do if my CD DVD label printer is not available in the list of printers?
- FAQ: Some objects look blurred on the print or image/pdf. How can I improve the quality of them?
- FAQ: Is there a possibility to enter default Printer and Printout settings and so not to edit them each time the user starts printing?
