Poster splicing instructions
You can get different types of posters by trying various ways of splicing them:
- Standard poster. Overlapped pages are glued together.
- Wall poster. Pages are glued to the wall.
- Tape poster. Pages are fixed by an adhesive tape.
Each poster page may have the following margin types:
- Trim margins. Marked by dashed line.
- Glue margins. Marked by solid line with hatch.
- Overlap margins. Marked by hatched image areas.
To get a ready-to-use poster, do the following:
Getting rid of trim margins
Standard poster
Trim left and top margins from all the pages. Leave the topmost and leftmost pages as they are.
Wall poster
Trim all proper margins from all the pages.
Tape poster
Trim all proper margins from all the pages. Leave the top margins for the topmost pages, left margins for the leftmost pages, etc.
Splicing the pages
Standard poster
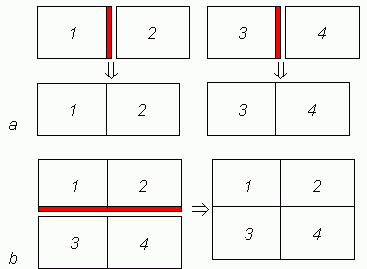
Figure 1 shows the gluing order. Glued areas are marked in red.
| Figure 1: Gluing order | Figure 2: Page overlapping |
 |
 |
Do the following:
- Glue pages together in rows from left to right (page 2 overlapping page 1, see Fig. 1 a).
- Connect rows from top to bottom (row 3-4 overlapping row 1-2, see Fig. 1 b).
When working with overlap margins, be careful when fitting one page with another (Figure 2).
Wall poster
Stick pages to the wall following their numbers.
Tape poster
Do the following:
- Put the pages on a table with their printed side down and arrange according to their numbers.
- Fix the order of pages by applying pieces of adhesive tape to their corners.
- Turn the poster up to see the image and check the page order.
- Tape the pages together carefully.
Trimming the poster edges
Standard poster, Tape poster
Trim the edges from a ready poster if it has no decorative border.
 Related topics: